Replicating Looker Dashboards Across Looker Instances with Gazer: A Step-by-Step Guide
Efficient Dashboard Migration with Gazer: A Comprehensive Guide

Copying dashboards from one Looker instance to another can be a useful way to save time and effort, especially if you have multiple Looker instances for different environments or business requirements. While there are several ways to copy dashboards, one popular tool is Gazer, a Looker plugin that allows you to easily export and import Looker content. In this article, we will focus on how to use Gazer to copy a dashboard from one Looker instance to another.
Why You Might Want to Copy Dashboards Between Instances
But before we dive into the steps, let's first explore why you might want to copy dashboards between instances and what Gazer is. Some companies use different Looker projects for different environments, such as having separate instances for staging, development, and production. Others use a hub-and-spoke model where multiple Looker instances import code from a single instance. In these scenarios, you may want to replicate dashboards across instances without having to recreate them from scratch.
There are different methods to copy dashboards, such as
converting the Dashboard to Lookml
Making use of the Looker API
And making use of Gazer.
Overview of Gazer
In this article, we will focus on Gazer. Gazer is a command-line tool that allows you to view, modify, copy, move, or even delete spaces, dashboards and looks in Looker. Under the hood, Gazer uses the Looker API to navigate and manage Spaces, Looks, and Dashboards via a simple command-line interface. With Gazer, you can easily manage the contents of your Looker instance with a few commands, saving you time and effort.
Requirements
In order to be able to install Gazer, you need to have Ruby installed on your system. If you don't already have Ruby installed, you can find instructions on how to install Ruby on your system on the official Ruby website.
Install Gazer
Once you have Ruby installed, you can easily install Gazer by running the following command in your terminal:
gem install gazer
This will install the latest version of Gazer on your system. Alternatively, you can check the Gazer documentation for other installation options.
With Gazer installed, we can now move on to the next step, which is to authenticate with your Looker instance.
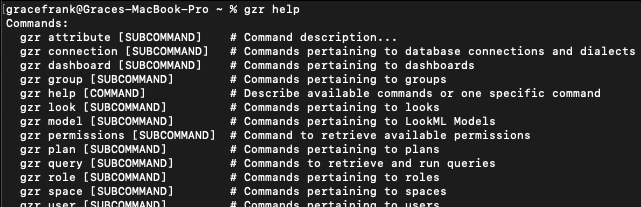
To make sure that you have installed Gazer correctly, you can run the following command in your terminal:
gzr help
This should display a list of available commands and options that you can use with Gazer. See screenshot below
With Gazer installed and confirmed to be working, we can now move on to the next step, which is to authenticate with your Looker instance.
Connecting to Looker
Since Gazer uses the Looker API to interact with Looker instances, you'll need to generate an API key to connect to your Looker instance.
Here's how to generate a Looker API key:
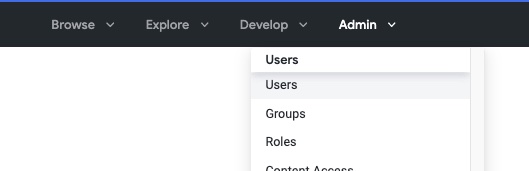
Log in to Looker with an account that has administrative privileges. Navigate to the "Admin" panel in the top-right corner of the Looker UI. Select "Users" from the left-hand menu.
You should see the list of all users, click on the edit beside the user you want to generate the API Key for, the user should have permission to manage and view spaces

On the page that comes up, Scroll down to the "API 3 Keys" section and click "New API3 Key".
If the user already has An API Key then you will see the "Edit keys" button
You should be able to see the Generated key as shown in the screenshot below

- keep this page open as we would be making use of this on gazer
Store Credentials
Now that you know how to create an API key, you will need to create API keys for both the Looker instance you want to copy the dashboard from and the Looker instance that the dashboard will be copied to.
Finally, it's time to open the terminal. Open your command line and create a .netrc file by running this command:
touch ~/.netrc
Now, you need to edit the .netrc file and include the API credentials of the Looker instances:
nano ~/.netrc
Add the following lines to the .netrc file:
machine mycompany.cloud.looker.com
    login <client_id>
    password <client_secret>

machine receivinginstance.cloud.looker.com
    login <client_id>
    password <client_secret>
Testing Connection
To test the connection, run the following command for both Looker instances (the one you are copying the dashboard from and the Looker instance that will receive the dashboard):
Note: Most Looker instances' APIs run on port 19999. However, if your Looker instance is hosted on the cloud, it should be on port 443. Make sure you use the appropriate port.
gzr user me --host mycompany.cloud.looker.com --port 443
On running this command, you should see the user email from which we created the API Key.
$ gzr user me --su 1237 --host foo.bar.mycompany.com
+----+----------+---------+---------------------+
|  id|first_name|last_name|email                |
+----+----------+---------+---------------------+
|1237|Susan     |Gibson   |sgibson@mycompany.com|
+----+----------+---------+---------------------+
Listing Spaces
Before we start copying dashboards between Looker instances, it's important to understand what Spaces are in Looker. A Space is essentially a container that holds Looks, Dashboards, and other content in Looker. You can think of a Space as a way to organize content in Looker, similar to how folders are used to organize files on a computer.
To list the Spaces in a Looker instance using Gazer, you can use the following command:
gzr space ls --host mycompany.cloud.looker.com --port 443
This will list all the Spaces in the Looker instance that you've connected to using the API credentials in your .netrc file. You should see a list of Spaces with their corresponding IDs, names, and descriptions.
You can also use the -p option to specify the Looker project that the Spaces belong to. For example:
gzr space ls -p my_project --host mycompany.cloud.looker.com --port 443
This will list all the Spaces in the my_project project.
By listing the Spaces in a Looker instance, you can get a better understanding of how content is organized and which Spaces you may want to copy dashboards to or from.
Exporting a Dashboard
To export a dashboard, you first need to obtain its ID. You can do this by going to the Looker UI, navigating to the dashboard you want to export, and checking the URL. The ID will be the number at the end of the URL.
Once you have the dashboard ID, you can use the following command to export it:
gzr dashboard download <dashboard_id> --dir <directory_path>
Replace <dashboard_id> with the ID of the dashboard you want to export, and <directory_path> with the directory where you want to save the exported dashboard.
Importing a Dashboard
To import a dashboard to another Looker instance, you can use the following command:
gzr dashboard upload <dashboard_file_path> --space-id <space_id> --host mycompany.cloud.looker.com --port 443
Replace <dashboard_file_path> with the path to the exported dashboard file, <space_id> with the ID of the space where you want to import the dashboard, and <looker_instance> with the URL of the Looker instance where you want to import the dashboard.
Note that you need to have API credentials and access to the space where you want to import the dashboard.
Once you run the command, Gazer will upload the dashboard to the specified space on the target Looker instance.
That's it! With Gazer, you can easily export and import dashboards between different Looker instances, saving you time and effort in recreating them from scratch.
Troubleshooting
Sometimes you may encounter errors while using gazer. One common issue occurs when a dashboard name has spaces. In such cases, you can escape the space by placing a backslash before it. For example, if you have a dashboard named "My Dashboard", you would use the command:
gzr dashboard fetch "My\ Dashboard" --space-id 4 --host mycompany.cloud.looker.com
If you encounter any other errors, make sure to check your credentials and API keys to ensure they are correct. Additionally, you can check the official gazer documentation for more troubleshooting tips and options.


